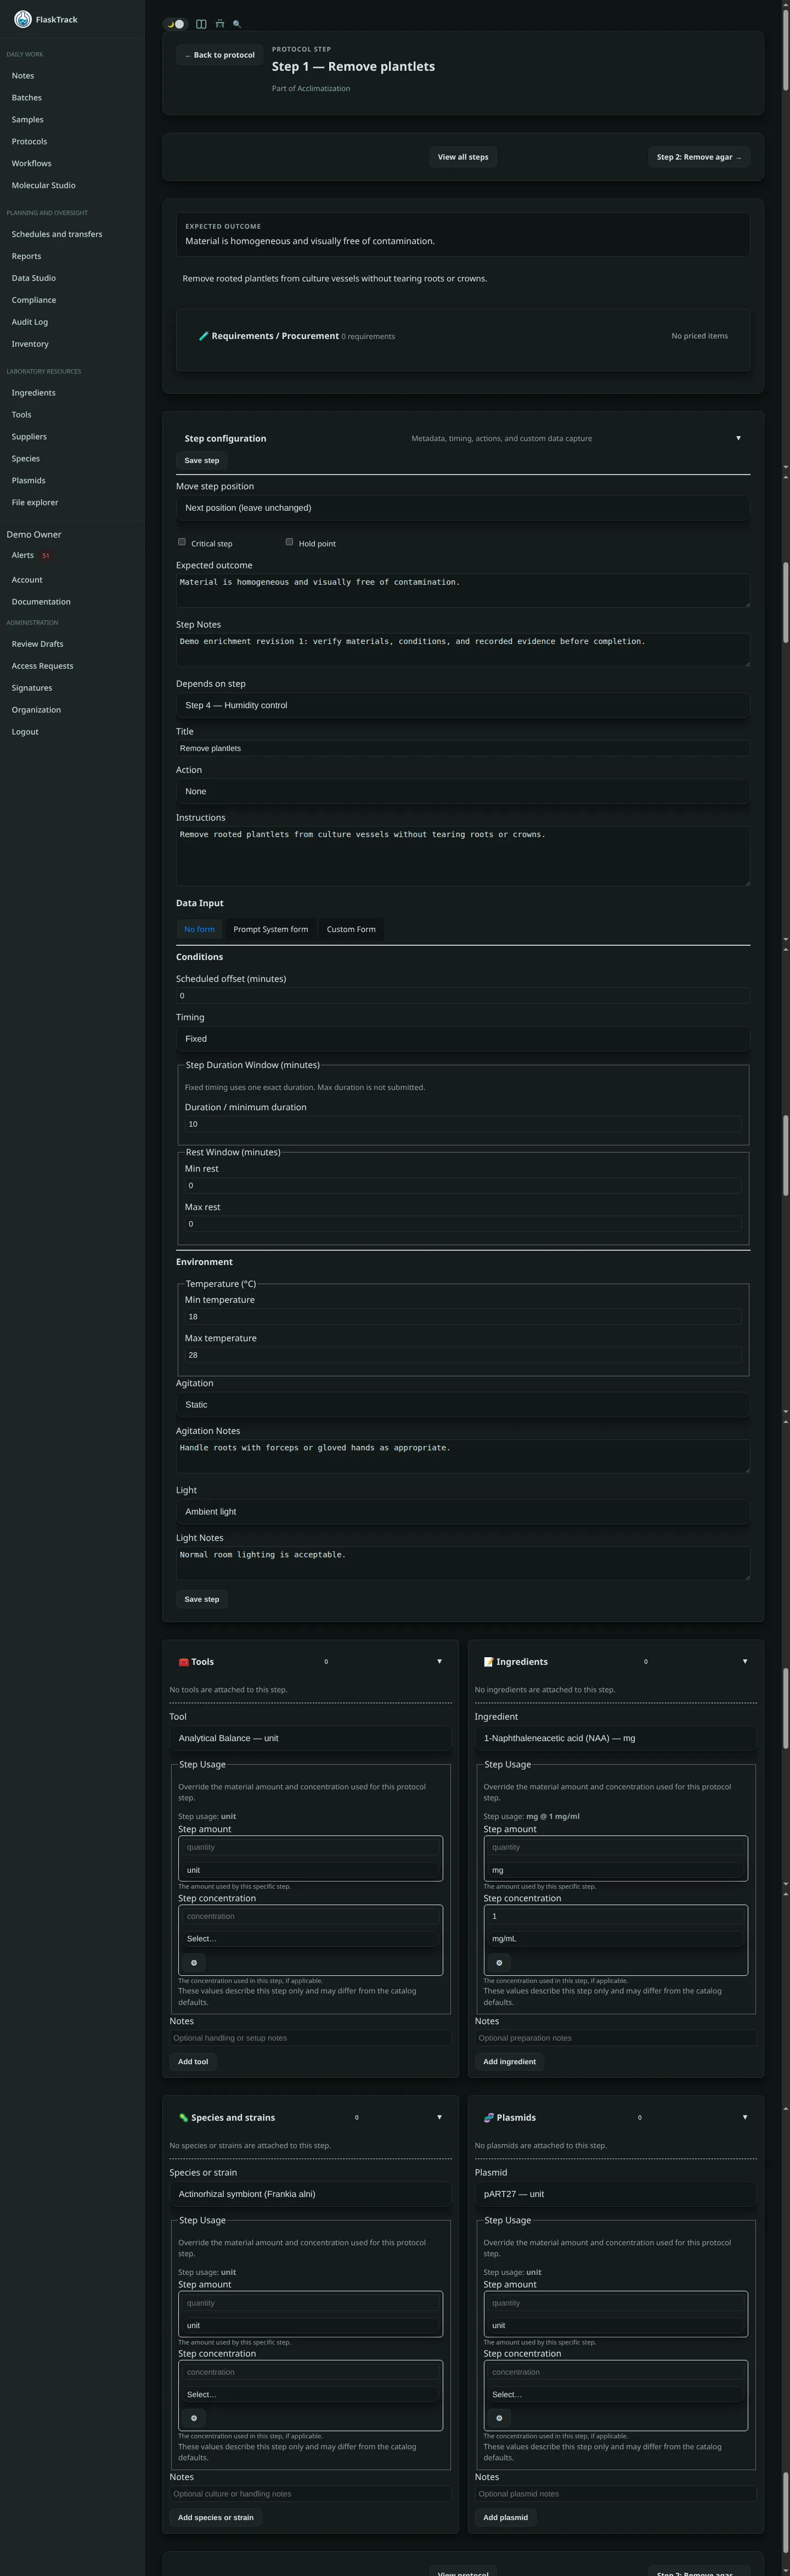
Create and Add Protocol Steps
Once a protocol has been created, the workflow itself is built by adding protocol steps.
A protocol may contain a single step or hundreds of individual steps. Each step represents a discrete laboratory operation and can define:
- laboratory instructions
- execution order
- required materials
- equipment
- plasmids
- species or strains
- environmental requirements
- timing constraints
- expected outcomes
- operator data collection
- validation rules
- automation
- documentation
Together these steps become the executable workflow used by batches and samples.
Adding a Step
Select Add Step from the Protocol Steps section.
Each new step becomes part of the protocol execution order.
Steps may be reordered or configured to depend on previous steps.
Every step contains several independent sections that can be expanded and edited.
Step Configuration
Every protocol step begins with its core configuration.
Depends on Step
A step may optionally depend on another step.
Dependent steps cannot begin until their prerequisite has completed.
This allows construction of complex workflows while preventing operators from performing work out of sequence.
Step Title
Provide a concise title describing the laboratory operation.
Examples include:
- Prepare Media
- Sterilize Equipment
- Transfer Explants
- Inoculate Plates
- Harvest Fruiting Bodies
- Verify PCR Product
The title appears throughout protocol execution, reports, audit logs, and dashboards.
Step Action
Step actions allow individual steps to update the workflow state of batches and samples on step completion while a protocol is still in progress.
Protocols are designed to represent reusable laboratory procedures that are assembled into larger workflows. A workflow typically consists of many protocols executed in sequence, with each protocol performing one portion of the laboratory process.
Most protocols contain multiple laboratory operations. Some of those operations represent meaningful workflow milestones that should be reflected immediately in the sample or batch status rather than waiting until the protocol has finished.
For example, a tissue culture workflow might contain separate protocols for:
- Sterilization
- Culture Initiation
- Multiplication
- Rooting
- Hardening
- Harvest
Within the Culture Initiation protocol, the workflow state may change several times:
| Step | Action |
|---|---|
| Prepare media | None |
| Sterilize explants | Sterilize |
| Transfer explants | Transfer |
| Inspect cultures | Inspection |
Although the protocol is still executing, the sample's workflow state is updated as each milestone is reached.
This provides more accurate laboratory reporting, allows dashboards to display current progress, and enables workflow automations to react immediately to important laboratory events.
Step actions are entirely optional. They should generally be assigned only to steps that represent meaningful workflow state transitions rather than every laboratory instruction.
Available actions include:
- Initialize
- Preparation
- Sterilize
- Transfer
- Inspection
- Quarantine
- Disposal
- Mark Contaminated
- Decontamination
- Inoculate
- Transformation
- Co-cultivation
- Selection
- Regeneration
- Confirmation
- Expand
- Subculture
- Induce Rooting
- Hardening
- Fruit
- Harvest
- Failure Analysis
- Fail
- Archive
- Complete
Instructions
Instructions describe exactly what the operator should perform.
These should be written as clear laboratory procedures.
Include:
- preparation
- measurements
- observations
- safety requirements
- calculations
- quality checks
Good instructions reduce operator variation and improve reproducibility.
Expected Outcome
Every step should define the expected result.
Examples:
- Agar completely dissolved.
- Root initials visible.
- Colonies evenly distributed.
- PCR band present.
- Cultures free of contamination.
Expected outcomes provide operators with a simple way to determine whether a step has been completed successfully.
Step Criticality
Steps may be marked as Critical.
Critical steps identify operations that have significant impact on quality, safety, compliance, or experimental success.
Examples include:
- sterilization
- transformation
- inoculation
- media preparation
- contamination inspection
Critical steps are prominently highlighted during execution and reporting.
Required Materials
Each protocol step may define the materials required for execution.
Unlike traditional protocol systems, FlaskTrack links requirements directly to centralized catalog items.
Supported requirement types include:
- Ingredients
- Laboratory Tools
- Species or Agrobacterium Strains
- Plasmids
Each requirement is independently tracked for inventory, procurement, costing, and reporting.
Ingredients
Ingredients represent consumable laboratory materials.
Examples include:
- media
- plant growth regulators
- antibiotics
- salts
- sugars
- buffers
- reagents
Each ingredient can define:
- quantity
- units
- concentration
- notes
- step-specific overrides
Ingredient quantities are automatically scaled using the protocol reference batch.
Tools
Tools represent reusable laboratory equipment.
Examples include:
- autoclaves
- balances
- pipettes
- incubators
- microscopes
Tools do not consume inventory but document equipment required to complete the step.
Species / Agrobacterium Strains
Certain workflows require additional biological materials.
Examples include:
- donor species
- recipient species
- Agrobacterium strains
- helper strains
Associating these materials with a step improves documentation and execution consistency.
Plasmids
Transformation workflows may require one or more plasmids.
Each plasmid can specify:
- quantity
- units
- concentration
- step-specific overrides
- notes
Plasmids remain linked to the laboratory catalog for traceability.
Step Usage Overrides
Every required material can optionally override its default catalog values.
Overrides are useful when a particular protocol uses:
- different quantities
- different concentrations
- protocol-specific preparation
- alternate formulations
Overrides affect only the current protocol step and never modify the catalog itself.
Data Collection
Each protocol step controls the information operators must record during execution.
FlaskTrack supports three approaches.
No Form
No information is collected.
Operators simply complete the step.
Prompt System Form
FlaskTrack automatically presents the standard data collection form associated with the workflow action.
This is useful for standardized laboratory operations.
Custom Form
Custom forms allow completely tailored operator input.
Fields may include:
- text
- numbers
- dates
- measurements
- concentrations
- species
- materials
- booleans
- selections
- and many additional field types
Fields can be marked as required.
Custom forms make it possible to collect exactly the information required by the protocol.
Validation Rules
Custom forms may include validation rules.
Validation ensures submitted data satisfies laboratory requirements before the step can be completed.
Examples include:
- exact values
- minimum or maximum limits
- comparisons
- required measurements
- protocol-specific acceptance criteria
Validation improves data quality while reducing transcription errors.
Timing
Timing controls how long a laboratory step is expected to take and when it should be scheduled.
These values help operators plan work, estimate completion times, and monitor overdue tasks.
Scheduled Offset
A scheduled offset delays when a step becomes available relative to the previous step or protocol schedule.
This is useful for workflows that require incubation, recovery, waiting periods, or delayed processing.
Timing Type
FlaskTrack supports four timing modes.
Fixed
The step requires one expected duration.
Example:
Incubate for exactly 30 minutes.
Minimum
Only a minimum execution time is required.
Operators may continue once the minimum duration has elapsed.
Example:
Sterilize for at least 20 minutes.
Range
Specify both minimum and maximum acceptable durations.
This is useful when laboratory procedures have an acceptable operating window.
Example:
Incubate for 18–24 hours.
Until Condition Met
The step has no predefined completion time.
Instead, operators continue until a biological or laboratory condition has been satisfied.
Examples include:
- roots visible
- contamination absent
- callus formed
- colonies established
- media cooled sufficiently
This timing mode is particularly useful for tissue culture and microbiology workflows where biological progress determines completion.
Rest Window
Steps may also define acceptable rest periods between workflow stages.
This is useful for incubation, recovery, acclimatization, rooting, or waiting periods.
Environmental Conditions
Environmental conditions document the expected environment required while performing a protocol step.
These values serve as laboratory guidance and improve reproducibility across operators and facilities.
Temperature
Specify the acceptable operating temperature range.
Both minimum and maximum temperatures may be defined.
Example:
- 22–25 °C
- 4 °C
- 121 °C during sterilization
Agitation
Specify how materials should be handled during the step.
Available options include:
| Setting | Typical Use |
|---|---|
| Static | No movement |
| Gentle Agitation | Slow mixing or orbital movement |
| Stirred | Continuous magnetic or mechanical stirring |
| Shaking | Orbital or reciprocal shaking |
| Rocking | Platform rocking motion |
Light
Specify lighting conditions for the step.
Available options include:
| Setting | Typical Use |
|---|---|
| Ambient Light | Standard laboratory lighting |
| Dark | Protected from light |
| Light / Dark Cycle | Alternating light and dark periods |
| Constant Light | Continuous illumination |
| Photoperiod Cycle | Controlled day/night schedule |
Light requirements are especially important for tissue culture, plant growth, fungal development, and photosensitive compounds.
Environmental Notes
Each environmental parameter may include notes documenting laboratory-specific requirements, observations, or special handling instructions.
Examples include:
- Keep media protected from direct sunlight.
- Maintain sterile airflow throughout transfer.
- Avoid vibration during incubation.
- Allow media to cool before inoculation.
- Keep dry ingredients sealed until use.
Saving Changes
Each section of a protocol step can be saved independently.
This allows complex protocols to be developed incrementally without requiring the entire workflow to be completed before saving.
Procurement Preview
As materials are added, FlaskTrack continuously calculates protocol requirements.
The procurement preview estimates:
- required ingredients
- inventory usage
- procurement quantities
- estimated costs
All calculations automatically scale using the protocol reference batch.
Building Complete Workflows
Most protocols consist of multiple connected steps.
A typical workflow might include:
- Prepare materials
- Sterilize equipment
- Prepare media
- Inoculate cultures
- Incubate
- Inspect
- Subculture
- Harvest
- Complete
Because every step records instructions, materials, environmental requirements, and operator data, FlaskTrack creates fully reproducible laboratory workflows that can be executed consistently across experiments, operators, and facilities.